

Tuesday, 31 August 2010
Demon Tattoo Art Quick Look Video
I did a quick video snap shot of two demon tattoo art pieces a few months ago on my YouTube channle and I thought I would spotlight them here too as I do want to lead into a new drawing tutorial soon about drawing some demon tattoos (Would this be a great idea?) and so in the following video I go through these two demon tattoos which are quite large in fact and they was drawn a few years ago.
Monday, 30 August 2010
Crayola Art Products
Crayola is a fantastic company that has been around for donkeys years and the art products are still as popular now as they were yester year and to celebrate that fact I am going to be spot lighting a few of the best Crayola Art Products out there today that I use off and on to create some of my fantasy artwork.
Crayola is best known for it's range of art products that are aimed at young kids to explore art, but even older kids and adults can still use the Crayola art range to create some fantastically creative art. The Crayola colored pencils are widely the most popular and best selling Crayola pencils as they are classic and easy to scribble, blend and draw as well as color with.
I use the color pencils from Crayola a lot to blend and color in some of my comic book character drawings to give them a color scheme, so that I can reference the character later on and have the drawings in the colors I selected for them.
Crayola Colored Pencils


Also Crayola Color has gone into other art products such as Washable markers which come in a wide range of broad art markers to super tip felt tips which are just great for coloring in large and small areas and the washable feature of these markers are excellent as most clothes and surfaces are washable if you get these markers drawn on you for what ever reason, some kids will be kids, especially nursery and young school kids.
As I've previously bought a lot of the Crayola art products over the years there is a lot of the pencils and markers which have different features, such as twistable color pencils and erasable color pencils and watercolor pencils, so the range is still fantastic and quite cheap too.
Washable art markers....


Crayola Crayons could be the first ever art product from Crayola that you are introduced to and I know I was when I was at primary school as they are great for young kids to draw with those wax like crayons and I've bought my two kids lots of Crayola Crayons over the years and even myself too, cheeky me!
The crayons are ace for laying down lots of color, although they do waste away quite quickly, they are very cheap and that's why I like them.
Crayola Crayons....


Crayola have many other art products and some are better than others, but go with the standard classics as they are the best in quality, Crayons, pencils, felt tip markers, coloring pads and activity kits are among the best as tested by my two kids over the years.
On the whole though I'd recommend mot of the Crayola art products that they have on offer....
Crayola is best known for it's range of art products that are aimed at young kids to explore art, but even older kids and adults can still use the Crayola art range to create some fantastically creative art. The Crayola colored pencils are widely the most popular and best selling Crayola pencils as they are classic and easy to scribble, blend and draw as well as color with.
I use the color pencils from Crayola a lot to blend and color in some of my comic book character drawings to give them a color scheme, so that I can reference the character later on and have the drawings in the colors I selected for them.
Crayola Colored Pencils
Also Crayola Color has gone into other art products such as Washable markers which come in a wide range of broad art markers to super tip felt tips which are just great for coloring in large and small areas and the washable feature of these markers are excellent as most clothes and surfaces are washable if you get these markers drawn on you for what ever reason, some kids will be kids, especially nursery and young school kids.
As I've previously bought a lot of the Crayola art products over the years there is a lot of the pencils and markers which have different features, such as twistable color pencils and erasable color pencils and watercolor pencils, so the range is still fantastic and quite cheap too.
Washable art markers....
Crayola Crayons could be the first ever art product from Crayola that you are introduced to and I know I was when I was at primary school as they are great for young kids to draw with those wax like crayons and I've bought my two kids lots of Crayola Crayons over the years and even myself too, cheeky me!
The crayons are ace for laying down lots of color, although they do waste away quite quickly, they are very cheap and that's why I like them.
Crayola Crayons....
Crayola have many other art products and some are better than others, but go with the standard classics as they are the best in quality, Crayons, pencils, felt tip markers, coloring pads and activity kits are among the best as tested by my two kids over the years.
On the whole though I'd recommend mot of the Crayola art products that they have on offer....
Sunday, 29 August 2010
How To Draw A Dragon
Drawing a dragon, those classic fantasy beasts that have wings and are usually an icon of fantasy art. This is a drawing tutorial which will look at the very many aspects of drawing a dragon and as such the first attempt is the best case scenario as I draw a Dragon and then try and do some extra blog posts around drawing different elements of a dragon creature.
As you may know, a Dragon can look very different as there are many dragons that have been created by many fantasy artists and one thing I always get drawn to creating is dragons with a personality. This drawing process is great, because you can learn to draw fire dragons, ice dragons, cave dragons and lots more and that's what we will do eventually as time goes on, I would like to do a full series on drawing some Dragons.
But for now, here is a Dragon drawing tutorial from the heart as I love these imaginary creatures, not too sure if they actually existed or that they got confused with dinosaurs, but they sure are cool to draw.
Side note: I've had a few emails about breaking my drawing tutorials into more precise parts and this is something that I will start to apply to my drawing tutorials over time and particular with my drawing videos on YouTube. Look for more detailed tutorials soon.
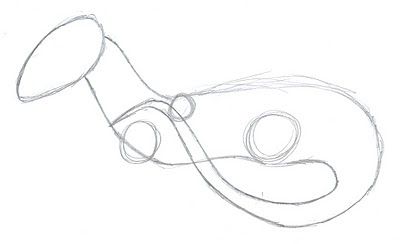
The first sketching step of your dragon drawing is to just begin....
The beginning step should mark out the important shape of the head and the two legs at the front as well as the wing shoulder and the larger circles represent the leg joints and the small one is the wing shoulder, try to lay them out roughly at first as the legs could change position later depending on how you draw your dragon.
If you draw them like I have, then you can assume that the body will be drawn around the arms and legs and the wings, so try and give yourself enough space to do so.
Dragon Beginning Sketch

The Second dragon sketch focuses on the body....
The body of the dragon must be drawn in now making sure to include your arm and leg and wing reference points and also to connect the head to the neck and body. The curve on the dragons tail is done with a view to draw in a tail end design of some sort later on.
The body shape of the dragon is long and when you come to draw the legs you'll see it all should balance out quite nicely, just remember that the back leg is slightly bigger to support the dragons weight more and this is shown with the larger leg joint than the front arm.
Dragon body sketching....
 The third stage of drawing sees the dragons whole body being worked out and that's not a Dragon going to the gym or anything, it's the final sketch stage that sees the whole figure decided upon, complete with the wings and the arms and legs and one thing that I have not decided to do is to draw the other set of legs at the other side because there is a good reason for that, as I am working on a separate blog post that will deal with the problem of drawing legs and arms behind the body as this has been mentioned quite a few times to me by email.
So look for that post soon to see the complete dragon...
Dragon Drawing sketching complete...
 The fourth stage of drawing our dragon is the inking stage that I so into doing on most of my drawings as I feel it gives your drawing a permanent and solid look of line work, a few details can be added at this stage and that's what I do with the head in particular with the eyes and the horned fin like spines as well as a few muscle lines along the way.
As I said before the dragon isn't finished yet as I want to address the problem of drawing legs behind the front legs which deals with foreshortening and some slight perspective, so watch out for that.
Dragon drawing inked....

As you may know, a Dragon can look very different as there are many dragons that have been created by many fantasy artists and one thing I always get drawn to creating is dragons with a personality. This drawing process is great, because you can learn to draw fire dragons, ice dragons, cave dragons and lots more and that's what we will do eventually as time goes on, I would like to do a full series on drawing some Dragons.
But for now, here is a Dragon drawing tutorial from the heart as I love these imaginary creatures, not too sure if they actually existed or that they got confused with dinosaurs, but they sure are cool to draw.
Side note: I've had a few emails about breaking my drawing tutorials into more precise parts and this is something that I will start to apply to my drawing tutorials over time and particular with my drawing videos on YouTube. Look for more detailed tutorials soon.
The first sketching step of your dragon drawing is to just begin....
The beginning step should mark out the important shape of the head and the two legs at the front as well as the wing shoulder and the larger circles represent the leg joints and the small one is the wing shoulder, try to lay them out roughly at first as the legs could change position later depending on how you draw your dragon.
If you draw them like I have, then you can assume that the body will be drawn around the arms and legs and the wings, so try and give yourself enough space to do so.
Dragon Beginning Sketch

The Second dragon sketch focuses on the body....
The body of the dragon must be drawn in now making sure to include your arm and leg and wing reference points and also to connect the head to the neck and body. The curve on the dragons tail is done with a view to draw in a tail end design of some sort later on.
The body shape of the dragon is long and when you come to draw the legs you'll see it all should balance out quite nicely, just remember that the back leg is slightly bigger to support the dragons weight more and this is shown with the larger leg joint than the front arm.
Dragon body sketching....

So look for that post soon to see the complete dragon...
Dragon Drawing sketching complete...

As I said before the dragon isn't finished yet as I want to address the problem of drawing legs behind the front legs which deals with foreshortening and some slight perspective, so watch out for that.
Dragon drawing inked....

Try some of these - Dragon Drawing Books for more dedicated help on drawing different dragons.
Also see the 3 part drawing video tutorial below for an alternative idea on drawing a Dragon idea.
Saturday, 28 August 2010
How To Draw A Hell Demon With Wings
Drawing a hell demon with wings is a favourite of mine to draw in what ever I like to draw and usually it's the horror side of fantasy art that I tend to draw the most and here is a quick drawing tutorial on how to draw a winged hell demon and I hope you like it!
First off the inspiration behind a winged demon is the gargoyle statues I probably have seen all over the world as I am a bit of a Gargoyle enthusiast really as some of the designs I find so inspiring to draw and create winged type creatures from, in the case of our hell demon we have to start off with the usual shape of the creature and how the muscles will work on the figure and how the wings are going to be drawn and so, here is the bit where I tell you about the first sketch which is the most important.
The beginning figure sketch....
We start off drawing some circle shapes that will represent the structure of the demon creature. Sometimes when I first start to draw I try to draw this way or other times I just draw the figure straight out as I know how to draw basic figures now, so I don't really need to use this method of building up figures from the draft sketch.
This rough draft sketching stage is the all important drawing stage and it doesn't matter if you get a few things wrong or you make a mistake as you can re-draw the sketch or start again. The trick is to just get the basics of the demon figure down on paper and work on it until you are happy with it.
In the drawing below I overlay the circles to emphasize the muscles, but not in great detail, just the general shape of the figure really and this helps to draw over this in the next stage...
First hell demon drawing - Basic Figure Shapes.
 Hell demon figure drawing development....
In the second stage of drawing I did in this instance use my lightbox to trace a rough outline of the figure and get a feeling for the full figure and in this drawing you can see the figure taking shape and this is what makes the drawing come together. Obviously I didn't trace over the circles for hands as I wanted them to just be a guide for the demons hands that will have claws and this is what I drew in on the drawing below.
When drawing basic figures keep in mind that the first draft drawing wasn't an exact reflection on all the muscle groups that you can now see in the second demon sketch, as now you can see on the arms, the bicep and tricep aswell as some forearm muscle lines which help to set the whole hell demon drawing off.
Take your time drawing and laying out your figure drawing, because sometimes a figure idea just pops it's way in there half way through the drafting process and what might look good drawing something one way, might look even better if you draw it another.
Look at the demon drawing development sketch....
 Finishing stages of the hell demon drawing...
In this drawing the drawing comes together quite nicely and there is no need for any further steps except to color them either with traditional broad art markers or on the computer with Photoshop. I like to ink the demon creature now and bring in some more details like the full demonic face and all of the muscles and finish the wings.
I haven't added much shading as I do want to scan my hell demon drawing into my Photoshop or Gimp art program and see what I can do with it in terms of color design I was thinking of some fire colors which could be a good idea since it is a demon from Hell.
When you are inking your demon creature try and get the important details out the way, such as any movement lines which help to make the drawing appear like it's a living creature and placing uneccesary details into your drawing will do you no good, so wherever possible try and draw only the absolute minimum details that won't over ride the drawing.
Inked Winged hell demon drawing....

First off the inspiration behind a winged demon is the gargoyle statues I probably have seen all over the world as I am a bit of a Gargoyle enthusiast really as some of the designs I find so inspiring to draw and create winged type creatures from, in the case of our hell demon we have to start off with the usual shape of the creature and how the muscles will work on the figure and how the wings are going to be drawn and so, here is the bit where I tell you about the first sketch which is the most important.
The beginning figure sketch....
We start off drawing some circle shapes that will represent the structure of the demon creature. Sometimes when I first start to draw I try to draw this way or other times I just draw the figure straight out as I know how to draw basic figures now, so I don't really need to use this method of building up figures from the draft sketch.
This rough draft sketching stage is the all important drawing stage and it doesn't matter if you get a few things wrong or you make a mistake as you can re-draw the sketch or start again. The trick is to just get the basics of the demon figure down on paper and work on it until you are happy with it.
In the drawing below I overlay the circles to emphasize the muscles, but not in great detail, just the general shape of the figure really and this helps to draw over this in the next stage...
First hell demon drawing - Basic Figure Shapes.

In the second stage of drawing I did in this instance use my lightbox to trace a rough outline of the figure and get a feeling for the full figure and in this drawing you can see the figure taking shape and this is what makes the drawing come together. Obviously I didn't trace over the circles for hands as I wanted them to just be a guide for the demons hands that will have claws and this is what I drew in on the drawing below.
When drawing basic figures keep in mind that the first draft drawing wasn't an exact reflection on all the muscle groups that you can now see in the second demon sketch, as now you can see on the arms, the bicep and tricep aswell as some forearm muscle lines which help to set the whole hell demon drawing off.
Take your time drawing and laying out your figure drawing, because sometimes a figure idea just pops it's way in there half way through the drafting process and what might look good drawing something one way, might look even better if you draw it another.
Look at the demon drawing development sketch....

In this drawing the drawing comes together quite nicely and there is no need for any further steps except to color them either with traditional broad art markers or on the computer with Photoshop. I like to ink the demon creature now and bring in some more details like the full demonic face and all of the muscles and finish the wings.
I haven't added much shading as I do want to scan my hell demon drawing into my Photoshop or Gimp art program and see what I can do with it in terms of color design I was thinking of some fire colors which could be a good idea since it is a demon from Hell.
When you are inking your demon creature try and get the important details out the way, such as any movement lines which help to make the drawing appear like it's a living creature and placing uneccesary details into your drawing will do you no good, so wherever possible try and draw only the absolute minimum details that won't over ride the drawing.
Inked Winged hell demon drawing....

Thursday, 26 August 2010
How To Draw A Minotaur
Minotaurs are huge bull like creatures usually depicted in the fantasy worlds as almost human form with hooves for feet and horns like a bull on the head and drawing them this time round has been fun and I hope you enjoy this little drawing tutorial.
How to draw a Minotaur
When starting to draw this minotaur I wanted to try and aim for a larger than life Minotaur, I'm sure you've seen the Narnia films with the Minotaur in that movie, well that is a great model to get some inspiration from and that's what I used,well at least the action figure I bought my son anyway.
The first step is identifying all of those muscles and grouping them in round circular shapes like I have in the sketch below, the reason I do this sometimes is to just show you how easy drawing figures actually is, when I'm drawing stuff out of my head I've pretty much learnt how to draw without using these shapes to show the muscles now and I just draw the creatures and figures as I see them in my head.

Once you have agreed a figure for your Minotaur, it is time to move on to the next stage, which is trying to identify how you are going to draw the realistic muscle mass instead iof the simplistic shapes, I tend to use a lightbox a lot if there is a complicated drawing I want to experiment with and you can really get some great results through using a lightbox.
Many people just assume lightboxes are just a tool for tracing, but if you use them right, they can be a very valuable tool for artists to create drawing out of plain rough draft sketches and much more, I highly recommend you buy a lightbox or at the very least you make one, if money's tight, just use a large window during the day with the sunlight shining through, worked for me for awhile, until I actually needed to work more on the night on drawing projects.
See the second sketch of the Minotaur as it really starts to come together quite quick on this one....
 I like the next step of our drawing a Minotaur as the details are the key to pulling this creature drawing off and starting to draw a muscle bound Minotaur as you can draw in exact details and the things that you want to achieve very well on this stage of drawing.
The hooves are the main challenge and the trick is to make them look real if you can, and I barely managed it, but I've never drawn a Minotaur before, so the next time I do, I will look closely at horses hooves in depth to take note of them and draw them better.
Here is the final pencil drawing of the Minotaur...
 I will update this drawing of a Minotaur at some point, maybe with drawing an in depth closer look at the Minotaurs head. I hope you enjoyed this Minotaur inspiration!
How to draw a Minotaur
When starting to draw this minotaur I wanted to try and aim for a larger than life Minotaur, I'm sure you've seen the Narnia films with the Minotaur in that movie, well that is a great model to get some inspiration from and that's what I used,well at least the action figure I bought my son anyway.
The first step is identifying all of those muscles and grouping them in round circular shapes like I have in the sketch below, the reason I do this sometimes is to just show you how easy drawing figures actually is, when I'm drawing stuff out of my head I've pretty much learnt how to draw without using these shapes to show the muscles now and I just draw the creatures and figures as I see them in my head.

Once you have agreed a figure for your Minotaur, it is time to move on to the next stage, which is trying to identify how you are going to draw the realistic muscle mass instead iof the simplistic shapes, I tend to use a lightbox a lot if there is a complicated drawing I want to experiment with and you can really get some great results through using a lightbox.
Many people just assume lightboxes are just a tool for tracing, but if you use them right, they can be a very valuable tool for artists to create drawing out of plain rough draft sketches and much more, I highly recommend you buy a lightbox or at the very least you make one, if money's tight, just use a large window during the day with the sunlight shining through, worked for me for awhile, until I actually needed to work more on the night on drawing projects.
See the second sketch of the Minotaur as it really starts to come together quite quick on this one....

The hooves are the main challenge and the trick is to make them look real if you can, and I barely managed it, but I've never drawn a Minotaur before, so the next time I do, I will look closely at horses hooves in depth to take note of them and draw them better.
Here is the final pencil drawing of the Minotaur...

Friday, 13 August 2010
Drawing A Halloween Fantasy Pumpkin
 Image via Wikipedia
Of course the classic image of a carved out pumpkin, we all have seen one at some point in our lives and so to draw what you see may apply here, but not always. When I draw a Halloween pumpkin, I always try and incorporate a basic design at the very core, but then try and stretch the features and make it more fantasy like.
Look at these Halloween Pumpkin drawings below to give you an idea, because all you have to remember is to include the stem and the eyes and carved out mouth and the lines going vertically down and that's it, so have fun drawing pumpkins and give them a unique design.


Halloween pumpkin art drawings by Wayne Tully.

Crayola Twistable Colored Pencils Review
The Crayola twistable color pencils are great for coloring drawings in and there's no need for sharpening and they are easy and fun to use for all coloring projects.
Watch the video below for the complete review of these ace colored pencils.
Crayola can still be one of the best colored pencil products next to Prismacolor and Derwent. I use them a lot because they are cheap and they do the job of coloring and even blending the colors too on my own drawing projects.
Everyone knows Crayolas art products as they have been around for many years and the many different brands that are avaialable are great for children to realise their creativity, but also not just for children as I am 32 years old and I use Crayola art products too.
Of the Crayola range that I use quite regularly are the Color pencils and the thick markers, aswell as the super tips too. Recently though I have been trying to use some of their other art products to get a feel on what works best and the twistables certainly do make life easier, especially when your pencil sharpener becomes daft and breaks the lead of your coloring pencils.
Anyway, watch the video and see me coloring in with them and talking about them a bit too.....
Draw What You Are Best At
Drawing what you are best at is a good option for those who are stuck drawing the same thing, realise this truth and stick to what you know. I myself draw in a comic book style and have become stuck drawing this way, but I am branching out by drawing in a cartoon style too and also trying to draw and even paint some fantasy art (coming soon in the form of a few video tutorials as I learn along the way myself.)
To draw what you are best at is a good idea, as you can become the expert in your field drawing the stuff that people will come to know you for and so with this comes a great amount of critism that this is all you can draw, but do stand your ground as others are only out to make themselves feel better by putting you down. Of course there is no harm in learning other styles of drawing and this type of thing as every artist learns in there own way.
But really an artist is remembered for creating one or two types of art and that becomes their trademark in their artistic field, so you don't have to worry about the bigger picture to start with, just pratice drawing and creating what you really like creating as this is one of the best bits of advice I can give you.
Although I'm not a professional artist in the sense that I don't have any books or anything like that out yet, but I have practised my art and honed my skills over the years with drawing tattoos and fantasy art and some comic book art which also I have coming up with some posts about drawing comic book stuff which I hope you'll enjoy.
Currently I am working on improving more on my art and that is the learning process that you should be taking yourself, draw other stuff to learn, but never lose sight of the best stuff that you can draw, because you will become well known for it.
Have fun drawing people and I'll have some interesting posts coming along quite soon.
Cheers now!
Wayne Tully.
Tuesday, 10 August 2010
New Pirate Skull Keychain Available To Buy
I drew this pirate skull awhile ago for a drawing video that never was (I accidentally deleted the drawing video...silly me!) and so I kept the pirate skull drawing and uploaded it to my hard drive and then colored it in slightly with Gimp and then made the colours a bit more surreal with the Cartoon filter which always makes it appear much cleaner sometimes, worth a try!!
Take a look!
Take a look!

Fantasy Artist Facebook Fan Page - Anyone Welcome To Join!!
I created a Fantasy art fan page on Facebook awhile ago and really it needs a few others to join it and contribute some stuff to it and that would make it better, although this won't be a substitute for this blog, but it could provide an avenue of any promotional opportunities for yourself as an artist or if you want to give any drawing advice, as this kind of stuff is most welcome.
Here's the Facebook Fantasy Art Page
Here's the Facebook Fantasy Art Page
Wednesday, 4 August 2010
Fantasy Creature Drawing Update
 Image via CrunchBase
Here is the original pencil drawing of the monster creature with all of it's tentacles curling around it's head....

And so with this updated fantasy creature drawing I was thinking about just making the pencil lines more solid with think black lines and that's what I did and I didn't even have to use the smudge tool as I am so fond of using on a lot of my artwork.
Here is the new drawing on a drinking mug, aswell as other Zazzle products, but you can see and compare both drawings to see which one is better, I like the updated versiion of this pencil drawing as it brings with it a sense of design whereas the pencil art just looks like an incomplete drawing.


Subscribe to:
Posts (Atom)