Thursday 1 July 2010

What Sketch Pencils Do I Use?

I thought it might be a good idea to mention what sketch pencils I use and why I have a stash of cheapo sketch pencils too. For any artist on the go who is very busy like me, then you don't want to strain your feeble brain on too many pencil purchase decisions, because art is what you make it and also some of the better sketch pencils can be expensive, but good to have in your artists tool box.

I'm a great believer in using pencils I am familiar with and often they are ones that I've used at school such as the Staedtler pencils, they come in all the grades and tonal ranges that you would expect and they are just downright comfortable to use, occasionally I do get a piece of blu-tack and wrap it aound the pencil for extra comfort when sketching.

Some of the mechanical pencils that you may see me drawing with in my drawing videos are my most favourite pencils to draw with, because all they require is the lead refills to top them up instead of having to sharpen them everytime, I use the super cheap Roseart Greatgrips, which I can't seem to find on Amazon, but they do exist, so do look for them in art shops as they are a great mechanical pencil to draw with.

The more expensive or branded drawing pencils like Derwent or Faber Castell can sometimes be found at bargain prices on Amazon and I've bought the odd few packs or tins of these sketch pencils with Amazon Gift certificates, but like any artist who is probably classed as a starving artist, then you may opt for the budget pencils to save money and they are just as good and you may find these listed as art pencil value packs

Tuesday 29 June 2010

A Vampires Castle, How To Draw A Vamps Castle

Vampires castles usually look rather large and almost ancient and that's the idea I suppose with drawing these types of castles, they must look this way, although you can experiment with the many different types of castle views I mainly use the tried and tested formula for drawing castles for vampires and here are the main things that I like to include in a vampires castle....

  1. Bats, somewhere in the drawing I just have to draw some bats, it doesn't matter where they are, just to include them is the best thing about drawing a vampires castle, for the best effect it might be a good idea to draw a line of them appearing out of a castle tower.
  2. Misty clouds, I usally sketch some in, right near the top of the castle towers, just to provide a little vampire spookyness to the mix.
  3. A dead tree, drawing one of these to the side of the castle helps to balance the castle scene and also to add some other focal point of interest there.
  4. A crumbling pathway, sketching in one of these, I just can't help myself as I always do it, one of these days I will try and draw the castle standing on it's own and see how it will look, until then try and set the path into the same rock mountain surface as the mountains that the castle is sitting on top of.
  5. Either drawing the moon or a sun set if you are going to colour your drawing helps to set the scene.
That's basically the requirements, but do feel free to add what you want in your own castle drawing for vampires....

Right for my sketch, I wanted to obviously include my requirements above and so starting out I loosely sketch what I want to place on the page and go from there, see the drawing below to see how I managed that... it's a fairly basic sketch as you see, but it serves the brilliant purpose of placing everything that I want included in there.


The next part is trying to develop those areas you identified previously. now take this sketch and place it on a lightbox with a fresh piece of paper over it and what you are going to do now is to draw a more detailed version of your draft sketch, if you don't have a lightbox yet, try taping your paper to a window and let the daylight act as a lightbox (I used to do this until I thought, hey I'll get a lightbox!)


By using the initial draft sketch as a guide you can draw a more improved version of your vampires castle, and this usually takes 2 or 3 times to refine and get right, see below!

Now the next stage I decided to redo the lightbox method and absolutely refine the drawing and try and improve on the previous drawing one more time, to make a final drawing of our vampires castle with a bit more detail on the rocky crumbling mountain and the dead tree at the side, also I put in some bats coming from a hole in one of the towers, which was probably inspired by being forced to watch Scooby Doo when my kids watch it.

Now by no means is the vampire castle drawing complete at this stage, but the idea and the final drawing is there below, so take a look and enjoy!

Grim Reaper Drawing - Drawing The Grim Reaper

Grim reaper drawing - How to draw the Grim Reaper

Drawing the Grim Reaper takes a little understanding of drawing skulls and the skeletal form and ragged cloaks too, but other than that it's a fairly creative and inspiring thing to try and draw, I've drawn a few Grim Reapers as tattoos in the past and I loved drawing them.

A Grim Reaper of death is usually black and the skull and hands are a bone colour, although some artists contrast and black and white against the cloak and the bones of the reaper so this is the route I shall take with my Grim Reaper drawing, first as usual is the beginning steps, the draft drawing which will form the basis of our Grim Reaper sketch.

Sometimes when first sketching out a drawing of something you may think oh this isn't going to work, but if you stick with it, the drawing magically just seems to come together, well that's what happened with this Grim Reaper drawing.

And so on our first quick drawing of a grim reaper, we do the usual quick sketching to map out where everything goes and this just gets easier when we try and visualize the drawing and what we want to have appear on the paper.


The next step is to again develo this reaper sketch and start to tinker with it to see what and how it will change, it can be experimental at times and this drawing was for me and I just went along with the flow, I re-work the skull and start to identify the cloaky rags more, I used my lightbox to help out with this by re-drawing over the shape of my first draft sketch I was able to come up with a better drawing easier.

I don't add a great lot of detail at this stage, as I am more concerned about the form of the Grim Reaper, this will come in the next stage, lots of detail and maybe a bit more of the background.


Now I have re-drawn another version using my trusty lightbox and now I can say that I am having fun drawing in all of the detail, all that remains for me to do is to darken it slightly which I'll do soon, but this is how I draw a Grim Reaper and they are not that hard to do if you have the vision to carry it through and have fun while you are doing it.

Refining the image is what makes your drawings look better and this is what I've done, I've made sense of my first two draft drawings and worked through them to develop the idea further.


Grim reaper art © Copyright Wayne Tully.

Monday 28 June 2010

Easy To Draw Fantasy Fairies

Drawing fantasy fairies can be easy if you follow these steps to drawing them. We all know Fairies are them small winged girls that fly about the place and sprinkle fairy dust around and in fact I never used to be a fan of drawing Fairies until I saw the work of Amy Brown and Sara Butcher, it was then that I thought, yes, I'll have a go at sketching them and trying to draw them, at first it was hard, but when you start to learn something new that you haven't drawn, then it will be difficult until you pick it up with practice.

When starting to draw a fairy, I like to get an idea of the figure first, because in my early attempts I did try to run before I could walk sort of thing with drawing fairies I would draw the wings first and then try and draw the fairy from the top to the bottom,an often it didn't work out very well, so I always with any drawing create a foundation of which to work from.

And this basic foundation drawing covers the rough figure of the fairy as pictured below.....and it doesn't have to be accurate or even perfect, as you can change things later, because I sure will!


And now we can refine that first fairy drawing by taking it and placing it on a light box or just place a piece of tracing paper over it, now as an artist you should be thinking in ways to improve the figure of the fairy, not re-trace the figure underneath, I use a pencil at first and then once I've got a good sketch going on I start to quick ink the figure, so I can scan it in my computer and clean up the drawing at a later stage.

Now the fairy figure looks a lot better, although the hands are wrong and this can be sorted out in the next stage of our drawing....as I just wanted to get the figure right and also notice how it is different from the original fairy sketch, I changed the legs and the way the fairy is flying and as an artist, this is what you do, you problem solve, you work out how to best draw something and that is all you can do, to refine the drawing.... take a look!....


Now the next part does involve a bit more work on the light box or transfering the idea and refining it further on tracing paper, but this is a solid method for showing you how fantasy artists refine ideas and make them look sparkling and magical and there maybe things that need to change still and that's ok, Rome wasn't built overnight in 30 seconds, so we try and make the figure better and also other details like the hands and the foot, because the other foot is behind the fairy, although I could have a few toes poking out, but it may look like a ding dong and this ain't no fairy in drag!

The third drawing seems much better as you go along and keep refining it, but there does come a time when you should stop and so I have stopped and just inked up a quick version of a fairy below....


So just have fun with fairies (?) drawing them I mean!!


Also see the post - Daily Sketching - Fairies

Daily Sketching - Monster Creature Draft Ideas

Monsters are a favourite of most artists to draw and it's the imagination I suppose that really helps to create some cool looking monsters and so here I have drawn some rough looking monster designs and they have been inspired by other monster types, can you guess what they are?

The monster below is a typical example of a monster with one claw arm and the other a couple of monstrous tentacles and I wanted the design of the piece to be structured as a convincing monster. the sketch may need some work later down the line, but with this quick ink sketch, you get the idea.


When drawing a monster it is perfectly natural to try and make it scary looking, but how do you do this? Well you can look to really simple photos and pictures of insects or animals for inspiration, you can use what you want out of these reference pictures and I like to use a variation on different things, such as a dogs head shape makes a great werewolf, but then if you place that dogs head on a horrible mass of tenteacles and a slimy blog, you have created an original and unique monster, so just go for it!

Now I just mentioned the blob idea, now take that idea and run with it, the quick sketch below was just a quick idea and I didn't think much about it, I just started to draw big hands and then a blob monsters with a tooth loaded mouth and there we go, ideas can just come and you can draw some quite cool stuff if you put your mind to it.

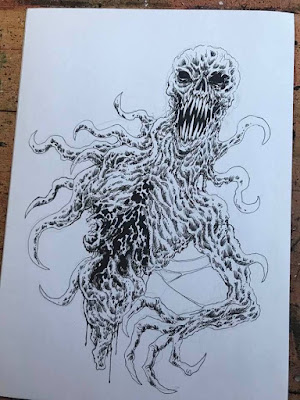
Edit: 19/05/2021 - It's interesting looking back on this post because the way I used to draw back in 2010 to now is way different and my art has improved a lot. Here is a monster sketch I did this morning to show that it is worth sticking with drawing if you love it and get better at it over time.

monster demon ink concept sketch