Thursday, 29 June 2023

How To Create And Structure An Art Course On Udemy


Create Courses on Udemy.com

Creating an art course on Udemy can be a rewarding experience that allows you to share your knowledge and skills with a global audience. Here are the detailed steps and helpful descriptions to guide you through the process:

Step 1: Plan Your Course
- Define your course topic: Decide on the specific focus of your art course. Consider your expertise and the target audience you wish to reach.
- Set learning objectives: Determine what you want your students to achieve by the end of the course. Break down the key skills and knowledge they should acquire.
- Outline your course content: Create a comprehensive course outline that covers all the essential topics and subtopics you plan to teach.

Step 2: Prepare Your Content
- Create video lessons: Prepare high-quality video lessons that deliver your course content. Ensure good lighting, clear audio, and a clean background. Break down complex concepts into manageable segments to aid understanding.
- Develop supporting materials: Supplement your video lessons with additional resources such as PDF files, worksheets, quizzes, or downloadable assets. These materials enhance the learning experience and provide practical exercises for students.

Step 3: Record and Edit Your Videos
- Set up your recording equipment: Use a good quality camera, microphone, and appropriate recording software. Consider using a tripod or stable surface to maintain consistent framing.
- Record your video lessons: Follow your course outline and script while recording your video lessons. Speak clearly, engage with the camera, and demonstrate techniques where applicable.
- Edit your videos: Trim unnecessary sections, enhance audio quality, and incorporate visual aids (such as text overlays or graphics). Editing software like Adobe Premiere Pro, iMovie, or Camtasia can help you achieve a professional look.

Step 4: Create Supplementary Materials
- Develop course materials: Create additional resources that support your video lessons, such as PDF documents, cheat sheets, or templates. Ensure these materials are well-organized and visually appealing.
- Design practical exercises: Include exercises or projects that allow students to apply what they've learned. Offer clear instructions and provide feedback on completed exercises to facilitate learning.

Step 5: Set Up Your Udemy Course
- Sign up as an instructor: Create an instructor account on Udemy (if you don't have one already) by visiting the Udemy website and following their registration process.
- Access the instructor dashboard: Log in to your instructor account and access the instructor dashboard, where you can manage and create courses.
- Create a new course: Click on the "Create a Course" button and follow the prompts to set up your new course.
- Course landing page: Design an engaging course landing page that highlights the course's benefits, learning outcomes, and instructor credentials. Use compelling images and descriptions to capture potential students' interest.

Step 6: Upload and Publish Your Course Content
- Upload your video lessons: Use the Udemy course management tools to upload your video lessons. Ensure your videos meet Udemy's technical requirements regarding file formats, resolution, and file size.
- Add supplementary materials: Upload any additional resources, such as PDFs or exercise files, to complement your video lessons.
- Organize your course content: Structure your course by arranging your video lessons and supplementary materials into logical sections and lectures. Provide clear and concise lecture titles and descriptions.
- Set course pricing and discounts: Determine the price for your course or consider offering promotional discounts to attract students.

Step 7: Optimize Your Course
- Optimize your course title and description: Craft a compelling course title that accurately reflects the content and appeals to your target audience. Write a clear and concise course description that highlights the unique value and benefits of taking your course.
- Add course objectives and learning outcomes: Clearly state the objectives and learning outcomes at the beginning of your course and in the course landing page. This helps potential students understand what they will achieve by taking your course.
- Create engaging course lectures: Make your lectures interactive and engaging by incorporating quizzes, assignments, and discussions. Encourage student participation and provide prompt feedback to foster a sense of community and motivation.
- Utilize multimedia and visuals: Enhance your course content by including images, illustrations, diagrams, or slides that further illustrate the concepts you're teaching. Visual aids can improve comprehension and retention for students.
- Include real-life examples and case studies: Illustrate your teachings with practical examples and case studies to help students understand how to apply the knowledge and skills in real-world scenarios.
- Use clear and concise language: Ensure your instructions and explanations are easy to understand. Avoid jargon or complex terminology unless necessary, and provide definitions or explanations when using technical terms.
- Leverage Udemy's promotional tools: Take advantage of Udemy's promotional tools to increase the visibility of your course. Offer limited-time discounts, participate in Udemy promotions, and utilize social media marketing to attract more students.
- Encourage student reviews and testimonials: Positive reviews and testimonials can significantly boost your course's credibility and attract more students. Encourage students to leave reviews and provide feedback, and respond to their comments promptly.
- Update and improve your course: Continuously evaluate and update your course content based on student feedback and industry trends. Keep your course materials current and relevant to ensure a positive learning experience.
Step 8: Launch and Promote Your Course
- Launch your course: Once you're satisfied with your course content and optimization, officially launch your course on Udemy. Make sure all the course lectures and materials are accessible and functional.
- Promote your course externally: Beyond Udemy's platform, promote your course through your website or blog, social media channels, email newsletters, or relevant online communities. Leverage your network and partnerships to increase awareness.
- Engage with your students: Actively participate in the course discussion boards, respond to student questions and comments, and provide guidance and support throughout the learning journey. Engaging with your students builds rapport and enhances the overall course experience.
- Monitor student progress and feedback: Regularly review student progress, completion rates, and feedback to identify areas for improvement. Use this information to refine your course content and teaching approach.
Remember, creating an art course on Udemy is an ongoing process. Continuously seek ways to improve your course, engage with your students, and stay updated with industry trends to provide a valuable and enriching learning experience.

Wednesday, 28 June 2023

How To Increase Motivation and Productivity As An Artist


motivation and productivity as an artist

Motivation is a key factor in increasing productivity and achieving your creative goals. Here are some strategies and techniques to help you get motivated and boost your productivity as an Artist or Creative:

1. Set Clear and Meaningful Goals: Start by setting specific, measurable, achievable, relevant, and time-bound (SMART) goals. Clearly define what you want to achieve, why it's important to you, and how you'll measure your progress. Having a clear direction gives you a sense of purpose and fuels your motivation.
2. Break Down Big Artistic Goals into Smaller Tasks: Large goals can feel overwhelming and demotivating. Break them down into smaller, manageable tasks or milestones. Celebrate your progress as you complete each task, as it provides a sense of accomplishment and encourages you to keep going.
3. Create a Schedule or Routine: Establish a daily or weekly schedule that includes dedicated time for your tasks and activities. Having a routine helps you develop good habits and reduces decision fatigue. Stick to your schedule as much as possible and build momentum by consistently working on your tasks.
4. Prioritize and Focus: Determine the most important tasks that will have the greatest impact on your goals. Prioritize these tasks and focus on them before moving on to less critical ones. Avoid multitasking, as it can decrease productivity and lead to distractions. Instead, concentrate on one task at a time.
5. Find Your Why: Understand the reasons behind your goals and why they matter to you. Identify the benefits, rewards, or personal values associated with achieving them. Connecting emotionally with your goals increases your motivation and helps you stay committed during challenging times.
6. Visualize Success: Take a few moments each day to visualize yourself successfully completing your tasks and achieving your goals. Imagine the positive outcomes, how it will feel, and the benefits it will bring. Visualization can reinforce your motivation and strengthen your belief in your abilities.
7. Break Through Procrastination: Procrastination can be a motivation killer. Combat it by starting with small, manageable tasks or setting a timer for a short burst of focused work. Once you get started, the momentum often carries you forward. Additionally, try incorporating techniques such as the Pomodoro Technique (working for specific intervals followed by short breaks) to maintain productivity.
8. Create an Inspiring Workspace: Design a workspace that is clean, organized, and visually appealing. Surround yourself with items that inspire and motivate you, such as quotes, pictures, or objects related to your goals. A well-designed workspace can enhance your focus and productivity.
9. Seek Accountability and Support: Share your goals and progress with a trusted friend, colleague, or mentor. Their support and encouragement can help you stay motivated and accountable. Consider joining a mastermind group or finding an accountability partner who shares similar goals to keep each other motivated and on track.
10. Take Care of Yourself: Self-care plays a crucial role in maintaining motivation and productivity. Get enough sleep, eat healthily, exercise regularly, and take breaks when needed. Taking care of your physical and mental well-being improves your energy levels, focus, and overall motivation.
Remember, motivation can fluctuate over time, so it's essential to revisit and adjust these strategies as needed. By implementing these techniques consistently, you can develop a motivated mindset and significantly increase your productivity.

Tuesday, 27 June 2023

Cosmic Horror Creature Art Print

 A Cosmic Horror Creature art print I made based on a loose ink drawing sketch that I fed into Midjourney AI and it created the following art print. The possibilities of creating multiple variations of the same design are almost endless. Check out the blog post I wrote on Using Midjourney

Monday, 26 June 2023

How And Why To Use Midjourney AI For Art Inspiration: Pros And Cons/Benefits And Uses


midjourney AI art inspiration

Midjourney AI is an artificial intelligence tool that generates art and design inspiration based on user input. The software uses machine learning algorithms to analyze patterns and trends in existing artwork and generate new ideas that align with those patterns. Here's a breakdown of how and why to use Midjourney AI for art inspiration, along with the pros and cons, benefits, and uses.


How to use Midjourney AI for art inspiration:
1. Start by selecting the type of art you want to create, such as a painting, graphic design, or digital art.
2. Input keywords related to your project, such as colors, themes, or subject matter.
3. Midjourney AI's algorithms will analyze your input and generate a range of art and design options that align with your preferences.
4. Browse through the generated options and select the ones that resonate with your vision.
5. Use the generated art and design options as inspiration for your own creative project.
Why use Midjourney AI for art inspiration:
1. Save time and effort: Midjourney AI can quickly generate a large number of art and design options, saving you time and effort in brainstorming and researching ideas.
2. Expand your creative boundaries: The generated options may introduce you to new styles and techniques that you may not have considered before.
3. Customization: Midjourney AI allows you to tailor the generated options to your specific needs by inputting your preferences, such as themes, colors, and subject matter.
4. Consistency: Midjourney AI can help you create a consistent look and feel across multiple projects by generating options that align with your preferences.


Pros and Cons of using Midjourney AI for art inspiration:
Pros:
1. Saves time and effort in brainstorming and researching ideas.
2. Expands creative boundaries.
3. Customizable to specific needs.
4. Creates consistency across multiple projects.
Cons:
1. Lack of human touch: The generated options may lack the unique human touch that comes with handmade artwork.
2. Limited range of styles: While Midjourney AI can generate a range of options, the styles may still be limited to the patterns and trends in existing artwork that the software is analyzing.
3. Requires input: Midjourney AI requires user input to generate options, which may not appeal to those who prefer a more intuitive, organic creative process.


Benefits and uses of Midjourney AI for art inspiration:
1. Generate new ideas for creative projects, such as paintings, graphic designs, and digital art.
2. Explore new styles and techniques that align with your preferences.
3. Create a consistent look and feel across multiple projects.
4. Save time and effort in brainstorming and researching ideas.
5. Tailor the generated options to your specific needs.

In conclusion, Midjourney AI is a useful tool for generating art and design inspiration that aligns with your preferences. While it may lack the unique human touch of handmade artwork and requires user input, it can save time and effort in brainstorming and researching ideas, expand creative boundaries, and create consistency across multiple projects.

Sunday, 25 June 2023

Daily Sketch: Dark Dimensional Cosmic Horror Art


cosmic horror creature art
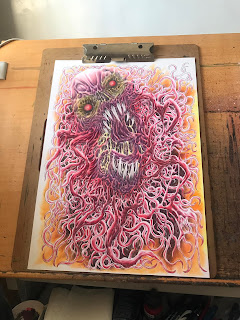
Another Dark dimensional cosmic horror artwork, part of a series of 10 art pieces that will form the same theme of horror creatures.

Still a work in progress colour wise. The red colours of the worm like tentacles need more work, as does the yellow background.

Eventually, I will complete the colours of these ten illustrations, so that I can get some Limited Edition Giclee art prints made and I won't be selling the original artworks anytime soon.

This series of art pieces will be the first of many different series, with an 80's horror movie poster series of 12 posters planned for after this themed series.