Sharpie black marker pens are considered the best for filling in black areas on commercial art and drawing projects and the fine point sharpies below are the best for sketching with and this is something that I do often after I've finished the last stages of the pencil drawings and I can ink over with some black sharpies as they are fade resistant and do not smudge, meaning that they are quick drying which is essential for any artist who likes to work quickly.
The Sharpie range comes in many colours too, not just black so that's why they have diversified with other colours and the colours are quite strong when you apply them to your artwork and don't leave streaky lines that traditional felt tips leave behind when applied to the surface of the paper you are colouring on.
What I prefer to do is to finish a pencil drawing and ink it with a black sharpie pen, then erase any remaining pencil lines with a good kneadable eraser or a cheap rubber and then start to colour with the range of colour pens available, I've got a few tins of Mini Sharpies for some smaller designs, like tattoo art that I create.
Here are a couple of videos that show quick examples of using the black Sharpie marker pens for inking -
Sharpie marker sketching example video
Sharpie Drawing/Inking Example Video
Thursday, 25 February 2010
Wednesday, 24 February 2010
Draw Skulls Easily With This Video
Watch the skull drawing video
I've been thinking about increasing my drawing video creations and so here is a silent video that you can follow to draw a skull easily, it's a short video and you can find out a super easy way to draw a skull, now this isn't a really detailed skull it's more along the lines of my type of comic book art style which you see on this blog alot.
Here is the video if you fancy a look at drawing an easy skull
Also see an example of a skull design I created and had Zazzle print it on a T-shirt - Skull Art T-shirt
Arts Question! What Art Do You Create?
Through my time on the internet I've seen many artists who draw and create different pieces of art and through each artwork that I look at I gain some unique inspiration from, I usually look at the art or the drawing to study it and see how it was accomplished and that to me is just fantastic when I can recognize how it was made and from the mind of an artist.
You already know that I like to create fantasy art and comic book styled art and tattoos, but what do you like to draw and create? I find stuff like this fascinating and particularly if you can provide a link to your current project then feel free to add it in the comments below.
Thanks for reading!
Monday, 22 February 2010
How To Draw A Demon Tattoo
Demon tattoos are my favourite, so what better way to go through a tutorial than with a how to draw a demon tattoo tutorial and now we can try and do a good solid demon design as that is what looks professional, first of all though you may need to do a few quick sketches of what you want to draw, because quite possibly sometimes you may draw some bad sketches, because like anything you need to warm up first and exercise your drawing hand.
So if you already have an idea of what your demon drawing will look like then select one of your best draft sketches and work on that one, I however have just created something right off the bat and out of my imaginative mind.
The first sketch is the most important, as planning out your full tattoo design is the way of the tattoo artist, so you know how it will look later on I draw some pretty basic shapes to begin with to really find out the overall shape and composition, drawing this way can open up more options for your tattoo drawing as you may accidentally come up with some new design ideas along the way and this is brilliant.
See my first little draft sketch, it's basic, it's raw and it already screams at me to finish it off and I know what I could do next, see the line I drew on the bottom of the oval shape, that will be the demons tongue and the line on the top of the demons head will be the horn, I don't know at this stage whether I'll do two horns, because I may just add something else to balance out the tongue and the horn....it is fun drawing monsters and demons..
Now I like to work over this sketch and try and make some more structure to it, I already know that it will be a demons head, but I want to start adding in the features so that it starts to look evil and demonic, the trick is to start with the eyes, by adding two crossed lines one line vertical and one line horizontal like in the pic below....
You see I have drawn in the eyes and the skull like nose and I've also marked out the teeth roughly as the 2 crossed lines help with all that.
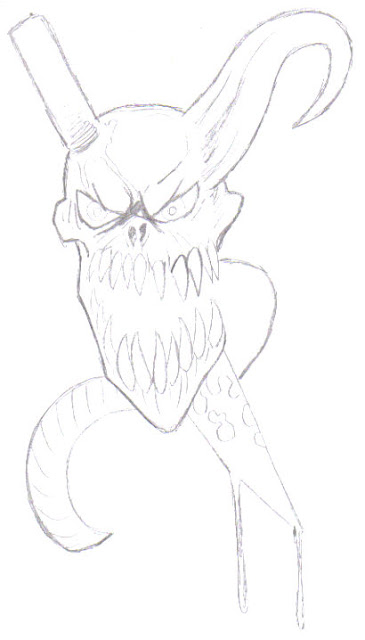
Now it's about adding in more detail, but don't go mad with details if you do intend selling the tattoo or getting it inked yourself as too much detail makes for a good drawing but a bad tattoo, as most tattoo artists will get rid of the details and make the design more fluid anyway, I add in the frown lines around the eyes on other lines to make the demon more evil with some minimal shading, also you will notice that I've drawn in a knife on the opposite side of the demons head, so that it balances the design.
Now we should have a near enough finished design of a demon tattoo, it's a just a case of darkening the pencil lines and making our design more stronger, so any dark areas need to drawn in hard now, ready for the inking stage, here's the drawing as it looks now before inking....
And....
Now onto inking the demon design and I do this with a sharpie marker and a finer ink pen for the details, remember though no super thin lines on your design, try to keep it as simplistic as possible, because when it comes to colouring the design some of them tiny lines may just fill in over time after the design has been tattooed.
Here's the final inked version of our demon tattoo...
Now you could colour it if you wished and that would something for an update on this blog, so just have fun with your demon tattoo drawing and good luck drawing tattoos.
Subscribe to:
Posts (Atom)